Solar imaging cameras: Picking the right gear
Wednesday, July 3, 2024
|
Jim Thompson |
Jim Thompson offers guidance on selecting the best solar imaging cameras, emphasizing local seeing conditions and telescope type. He highlights the importance of sensor pixel size, choosing monochrome over color cameras, and selecting the right sensor size for capturing detailed images of the Sun.
There are many different areas one can explore in the field of amateur astronomy. Although much of my time is spent on deep sky object observation via Electronically Assisted Astronomy (EAA), I also enjoy imaging solar system objects as it is something that I can easily do from my urban backyard. Of particular interest to me is solar imaging as our Sun presents a very interesting and ever-changing target for observation. Although there are several different pieces of equipment needed to safely and effectively image the Sun, perhaps the most important to the quality of your results is your camera. There are numerous brands and models of cameras purpose-built for solar imaging today. In this article, I will provide some guidance on how to choose the best camera for your particular application.
The objective of the solar imaging cameras
The objective of the camera is to collect large volumes of high-quality image data from your optical setup, for use by post-processing software after the fact. Depending on your setup and overall objectives, the characteristics most desirable to you in a camera will vary. That said, there are many camera characteristics that are common in a solar imaging camera regardless of its specific application.
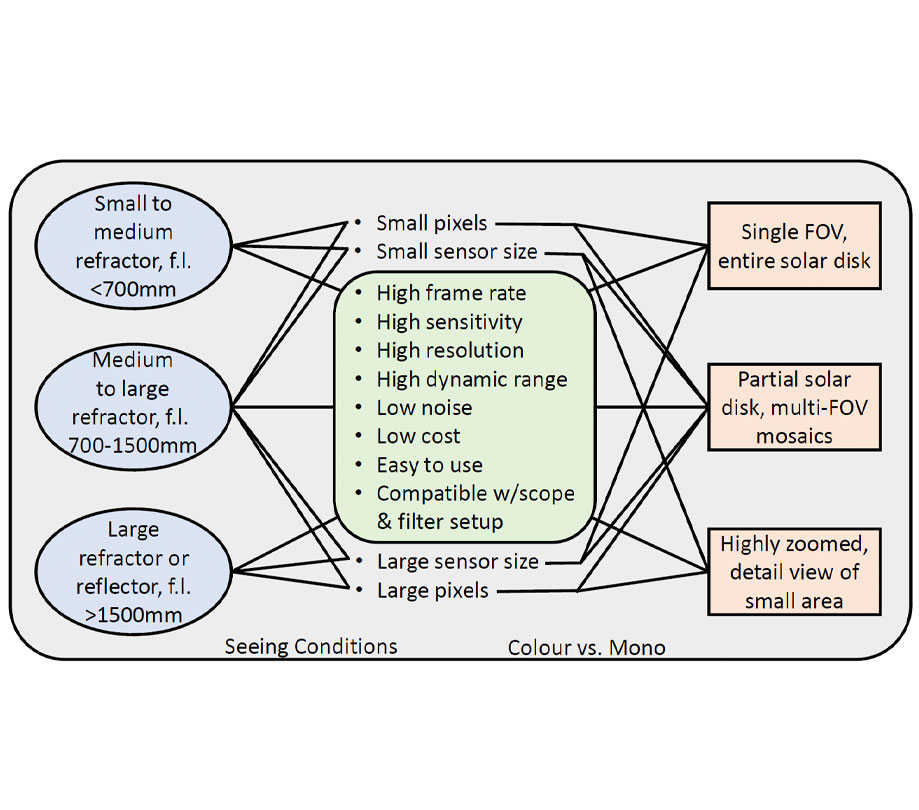
Figure 1 illustrates the relationship between telescope setup, camera characteristics, and desired output, with the commonly desirable traits listed in the green box. Two important factors that influence this relationship are your local seeing conditions, and whether you choose to use a one-shot-color (OSC) or monochrome camera. These factors are discussed in more detail below.
Figure 1 Relationship between scope setup, camera characteristics, and desired output
Impact of seeing
Your local seeing conditions, that is the unsteadiness of the Earth’s atmosphere in the direction you are aiming your telescope, has a critical impact on the outcome of your solar imaging. Regardless of how expensive the equipment you are using is, if you have poor seeing your results will also be poor. For that reason, it is worth the time to figure out what camera properties are best suited to your local seeing conditions, most notably sensor pixel size. Figure 2 presents the relationship between scope aperture and resolvable resolution for three wavelengths of interest to solar imagers. The curves are a calculation of the Rayleigh diffraction limit on the resolution of optics. Also identified in the plot is the resolution that is achievable for different levels of seeing. Take for example a person using a 100mm aperture f/7 refractor to capture image data with their Solar Continuum filter (540nm). The best resolution that their optics can deliver at that wavelength is around 1.4 arcseconds. To be able to realize that minimum resolution the local seeing conditions need to be average or better. If that person’s local seeing conditions are never better than below average, they may want to consider using a smaller refractor since they will not be able to realize the minimum resolution possible with the 100mm scope due to the seeing.
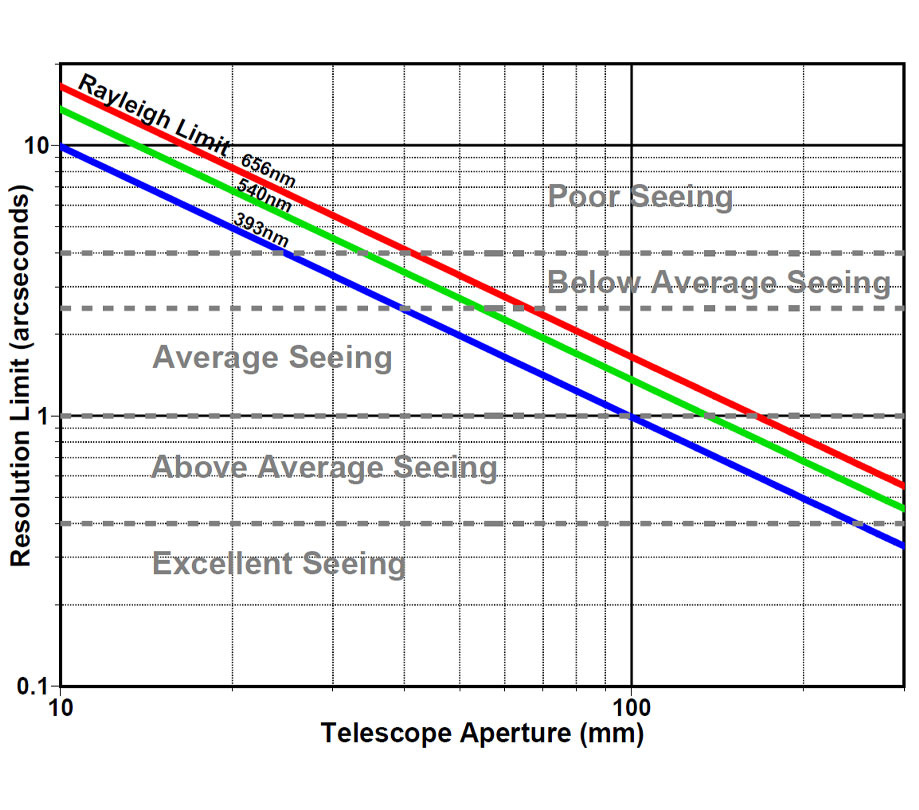
Figure 2 Telescope resolution limit vs. aperture and seeing
Assuming that the person does indeed have average or better skies, what is the optimum sensor pixel size that they should be using? There is some math involved in figuring out how the minimum resolvable telescope resolution translates to image size in the sensor plane. I used a free online tool to populate the graph in Figure 3, which shows the calculation of camera resolution for a range of sensor pixel sizes versus telescope focal length. To use this plot the last thing to take into account is that sampling theory indicates that we should use a camera resolution that is smaller than the size of the detail we are trying to capture. The research of Harry Nyquist is often cited in this regard, with his general rule being to use a pixel spatial frequency that is 2x what we are trying to capture. The fact that we are lucky imaging allows us to potentially push a little past the theoretical resolution limits set by our scope aperture. Sample frequencies up to 3x what we are trying to capture can be used in our application. If we go back to the example above, the minimum resolvable resolution of that setup was 1.4 arcseconds, so for that 700mm focal length scope we should choose a sensor pixel size that gives us a resolution ½ to ⅓ that size or 0.7 to 0.5 arcseconds. From Figure 3 that results in a sensor pixel size of approximately 2.5 to 1.8µm. If we were to choose a camera with pixels larger than this, we would potentially not capture the full resolution our telescope is capable of providing. Choosing a camera with pixels much smaller than this is a waste as we are not likely to realize any additional resolution in our images but we are sacrificing our sensitivity by using smaller pixels than we need.
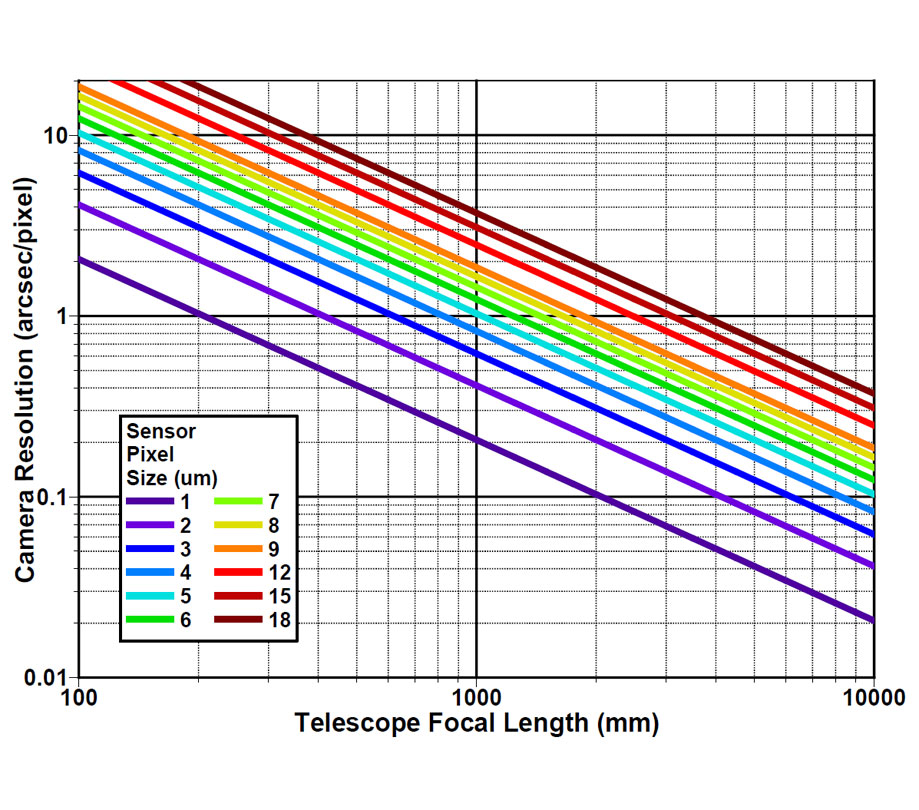
Figure 3 Camera resolution vs. telescope focal length
Color vs. monochrome
I encourage people to try solar imaging if they have not done so already. Simply use whatever camera you have available, whether it is OSC or monochrome, and see what you can achieve. That said, if you plan to purchase a camera specifically for solar imaging, you will achieve much better results if you purchase a monochrome camera. Although it is possible to image the Sun in broadband white light, the most interesting views come from imaging through a narrowband filter. Probably the most popular band to observe and image the Sun in is Hydrogen-α at 656nm, but Calcium-II K (393nm) and Solar Continuum (540nm) are also popular. If you were to combine one of these narrowband filters with an OSC camera, not all of your camera’s pixels would be collecting data. For Ca-K and H-α you will only be collecting data on one pixel out of every four, and for the Solar Continuum two pixels out of every four. This would effectively be a large decrease in your camera’s resolution. To use all of your camera’s sensor pixels with a narrowband filter, you need to use a monochrome camera. Another advantage of using a monochrome camera is that since they don’t have a Bayer matrix over the sensor like an OSC camera does, they have more overall sensitivity for the same sensor model.
Sensor size
Also important to the user is how much of the Sun can be captured by the camera in one field of view (FOV). If your intention is to capture the entire solar disk in one FOV, you will need a sensor that can cover more than 30 arcminutes at your scope’s focal length. Figure 3 can be used to help calculate how large a sensor is needed. For example: if we have a 1000mm focal length scope and are considering a camera with 5µm pixels, from Figure 3 the FOV of one pixel is approximately 1 arcsecond. Thus, to be able to capture the entire solar disk in one FOV we need a sensor resolution greater than (30*60/1=) 1800 pixels, or in terms of sensor dimensions (1800*5/1000=) 9mm in width and height.
Sensor selection
As you might imagine, there is a long list of potential monochrome sensors suitable for solar imaging; not as long a list as for OSC sensors, but long enough to give consumers some choices. The majority of sensors made for commercial applications today are CMOS type, the bulk of which are made by Sony. I have combed through Sony’s website to assemble the list of monochrome sensors presented in Table 1. A number of relevant sensor characteristics are summarized in the table, including the particular technology employed. The particular Sony technologies being used are as follows:
- Starvis = low light level high sensitivity design for security cameras, achieved via backside-illuminated pixels (BSI), later generation sensors have deeper pixels that increase NIR sensitivity
- Starvis2 = Increase pixel volume to give larger full well depth
- Exmor = on-chip analog/digital signal conversion and two-step noise reduction
- Exmor R = back-illuminated version, ~2x as sensitive as original Exmor
- Pregius = global shutter technology
For a number of the newer sensors in the list, I have had to make an educated guess at their sensitivity based on the technology that is reported to be used in the sensor. Sony, for whatever reason, decided to change the way they report sensitivity in their datasheets, making direct comparisons with older sensors much more difficult.
Table 1 Summary of available monochrome SONY sensors
|
Sensor |
Sensor Type |
Sensitivity (mV) |
Area Normalized Sensivity (mV/sq µm) |
Full Well Depth (e-) |
Sensor Diagonal Size (mm) |
Sensor Dimensions (mm) |
Pixel Size (µm) |
Effective Pixels |
Resolution |
Shutter Type |
Max Frame Rate (fps)3 |
MP Normalized Frame Rate (MP/s)3 |
Examples |
|
IMX035 |
Exmor |
460 |
35 |
15.5K |
6.08 |
4.7x3.8 |
3.63 |
1.3MP |
1270x1030 |
rolling |
15 |
19.6 |
Mallincam SSIm ($550) |
|
IMX174 |
Exmor, Pregius |
825 |
24 |
32K |
13.4 |
11.3x7.1 |
5.86 |
2.35MP |
1936x1216 |
global |
165 |
388 |
ZWO ASI 174MM ($499), Player One Apollo-M ($499) |
|
IMX1784 |
Exmor R, Starvis |
380 |
66 |
15K |
8.92 |
7.4x5.0 |
2.4 |
6.44MP |
3096x2080 |
rolling |
30 |
193 |
ZWO ASI 178MM ($299), Player One Neptune-M ($299), Altair CP-CAM3 178M (£300) |
|
IMX1834 |
Exmor R, Starvis |
388 |
67 |
15K |
15.86 |
13.2x8.8 |
2.4 |
20MP |
5472x3648 |
rolling |
25 |
499 |
ZWO ASI 183MM ($699), RisingCam IMX183 ($580) |
|
IMX2264 |
Exmor R, Starvis |
280 |
82 |
11.1K |
9.33 |
7.5x5.6 |
1.85 |
12.4MP |
4072x3046 |
rolling |
40 |
496 |
Imaging Source DMK 33UX226 ($574), RisingCam IMX226 ($470) |
|
IMX287 |
Exmor, Pregius |
3360 |
85 |
21.2K |
6.3 |
5.0x3.8 |
6.9 |
0.4MP |
728x544 |
global |
437 |
165 |
Mallincam DS287M ($450), Altair GP-CAM3 287M (£300) |
|
IMX290 |
Exmor R, Starvis |
6701 |
801 |
14.6K |
6.46 |
5.6x3.2 |
2.9 |
2.13MP |
1945x1097 |
rolling |
120 |
256 |
ZWO ASI 290MM ($249), Player One Mars-M ($249), Altair GP-CAM3 290M (£200) |
|
IMX429 |
Pregius S |
1677 |
83 |
24.8K |
11 |
8.75x6.6 |
4.5 |
2.86MP |
1944x1472 |
global |
84 |
240 |
Player One Apollo-M MINI ($399) |
|
IMX432 |
Pregius |
4050 |
50 |
97K |
17.6 |
14.5x9.9 |
9 |
1.7MP |
1600x1100 |
global |
100 |
176 |
ZWO ASI 432MM ($599), Player One Apollo-M MAX ($599) |
|
IMX462 |
Starvis |
670? |
80? |
11.2K |
6.46 |
5.6x3.2 |
2.9 |
2.12MP |
1960x1096 |
rolling |
120 |
254 |
ZWO ASI 462MM ($299), Player One Mars-M II ($299) |
|
IMX492 |
Exmor R, Starvis |
1700 |
79 |
66K |
23.1 |
19.1x13.0 |
4.632 |
11.8MP2 |
4168x28242 |
rolling |
16 |
189 |
ZWO ASI 294MM ($999), RisingCam IMX492 ($1980) |
|
IMX533 |
Starvis |
1130? |
80? |
50K |
15.97 |
11.3x11.3 |
3.76 |
9.07MP |
3003x3003 |
rolling |
20 |
181 |
ZWO ASI 533MM ($799), Player One Saturn-M SQR ($799) |
|
IMX545 |
Pregius S |
600? |
80? |
9.7K |
14 |
11.3x8.3 |
2.74 |
12.28MP |
4096x3000 |
global |
49 |
602 |
Basler a2A4096-30umBAS ($1449), Imaging Source DMK 33UX545 ($?) |
|
IMX546 |
Pregius S |
600? |
80? |
9.7K |
11.1 |
7.85x7.85 |
2.74 |
8.1MP |
2840x2840 |
global |
71 |
575 |
Basler a2A2840-48umBAS ($899), Imaging Source DMK 33UX546 ($?) |
|
IMX547 |
Pregius S |
600? |
80? |
9.7K |
8.8 |
6.79x5.59 |
2.74 |
5.0MP |
2488x2048 |
global |
108 |
540 |
Basler a2A2448-75umBAS ($739), Imaging Source DMK 33UX547 ($?) |
|
IMX678 |
Starvis 2 |
320? |
80? |
9K |
8.86 |
7.7x4.3 |
2 |
8.4MP |
3840x2160 |
rolling |
60 |
504 |
QHY 5III678M ($349), RisingCam IMX678 ($435) |
- I question the Sony published mV sensitivity value of 1200 for the IMX290 as all the other sensors on this list using the same technologies have mV/sq µm values around 80.
- IMX492 has “unlocked bin 1” mode: pixels un-bin to native 2.32µm size, 47.1MP & resolution 8336x5648. Effect on frame rate unknown but presumably a reduction by a factor of two.
- The max frame rate is as quoted in sensor datasheets for full resolution 10-bit frames. Frame rates achieved by actual cameras may be lower than this value, and vary by camera manufacturer.
- These sensors have been demonstrated to produce artifacts when imaging at long wavelengths (eg. H-α).
Other important traits
So far this article has provided guidance on selecting: pixel size, monochrome vs. color, and sensor size. I have also provided a list of available sensors to choose from. To make the final decision on what camera is best there are a few other camera characteristics to consider:
Sensitivity
The more sensitive the sensor, the better. There is a big advantage to being able to keep your exposure time as low as possible. With short exposures, your image frames will be sharper since the seeing has less time to blur the view. This is especially true when using the camera with a very narrowband filter such as Ca-II K or H-α.
Full well depth
The larger a sensor’s well depth, the better. The sensor well depth has a direct impact on dynamic range. The Sun is a high-dynamic range object, so a sensor with more dynamic range is better. This is however a secondary requirement since it is assumed that the user will be stacking 10’s to 100’s of frames which will work to recover dynamic range in the image.
Shutter type
You may find some debate online regarding which is better, a global or rolling shutter. When the scene you are trying to capture is moving quickly, a global shutter is best. However, in this particular application, the exposure times being used are very short, on the order of milliseconds or fractions of a millisecond. At those exposure times, even a rolling shutter will work just fine for solar imaging.
Frame rate
Frame rate is affected by exposure time, but at the exposure times typically used for solar imaging, the frame rate is more limited by the read-out speed of the sensor and the associated transfer of the data to your computer. Typically it is best to go for as fast a frame rate as possible since this will reduce the amount of time it takes for you to capture your desired quantity of frames. Although largely a convenience thing, there can at times also be real limitations on how long you should take to capture your image data.
For example: if the particular feature you are trying to capture is changing over a short period of time, like a solar flare or eclipse, you will need a fast frame rate to capture the view before it changes in appearance enough to blur the image.
Artifacts
Some of the sensors in Table 1 have issues with artifacts generated by the way the sensor is constructed. This artifact shows up particularly well when imaging at long wavelengths, such as Helium-D3 (588nm) or H-α. Figure 4 illustrates the appearance of the artifacts. Some users have had success applying calibration frames (i.e. flats) to remove the pattern from the IMX178 and IMX183. In the case of the IMX226 sensor, it is possible to remove the pattern by applying a custom convolution filter, or by applying some noise reduction during the sharpening process. Stacking can also remove the pattern if there is some image drift and seeing is good, otherwise stacking software tends to align on the artifact pattern instead of the solar features. Before choosing a camera with one of the affected sensors, the user must decide if they are willing to accept the additional effort associated with managing the pattern.
Cost
At the end of the day it may not matter that the perfect camera for your application exists if it sells for an unaffordable price. This is why older smaller sensors are still very popular for solar imaging; their costs are much lower than for new sensors. Everyone has their own price threshold, but generally one should be able to find a good-performing camera for under $ 500 USD.
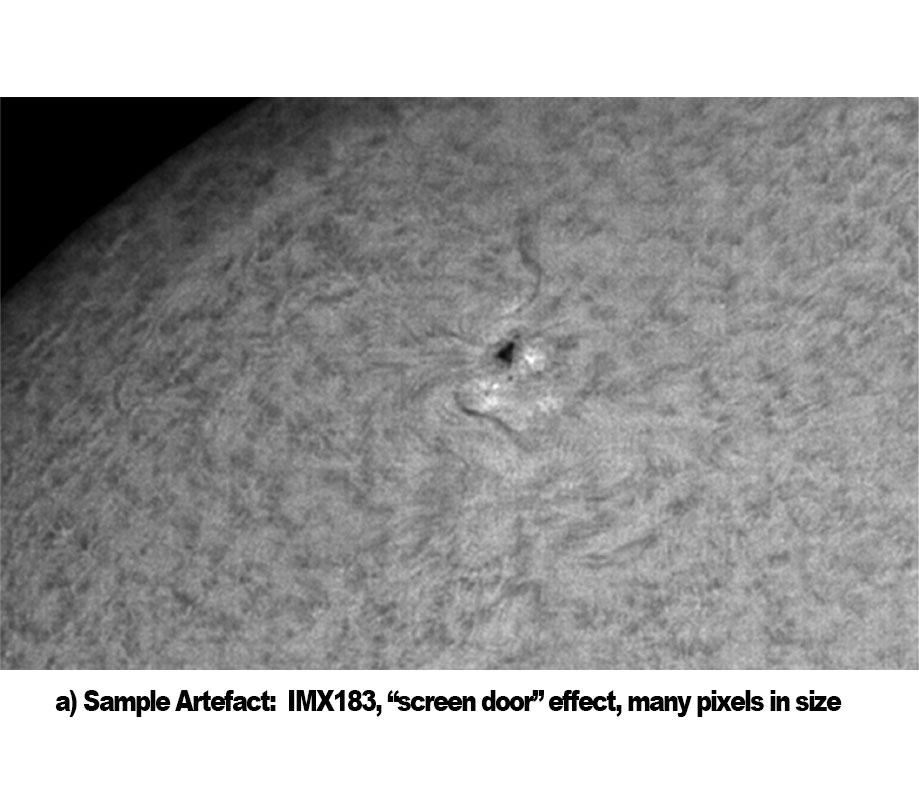
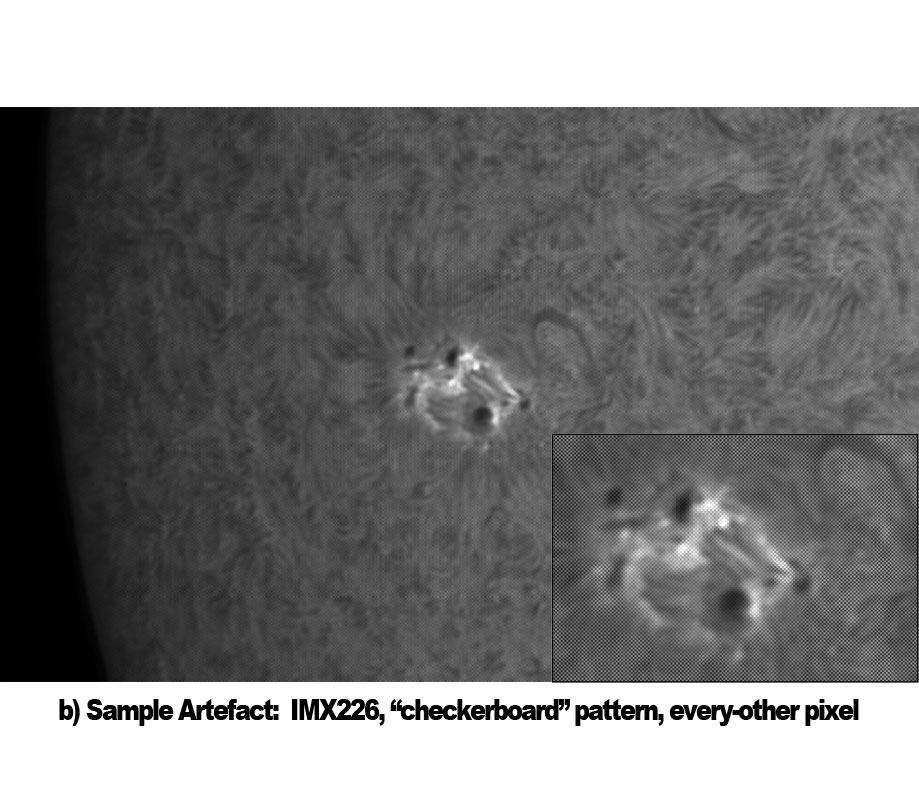
Figure 4 Sensor artefact examples: Hydrogen-α imaging w/ IMX183 and IMX226
a) Sample Artefact: IMX183, “screen door” effect, many pixels in size
b) Sample Artefact: IMX226, “checkerboard” pattern, every other pixel
Sample camera scenarios
Using the information provided above, the amateur should have all the information they need to pick a camera that will work well for their application. To help drive this home, let’s consider two sample scenarios:
Scenario A
- 80mm f/6 refractor + Herschel safety wedge + Calcium-II K filter
- full solar disk in one FOV (Figure 5)
- below average seeing
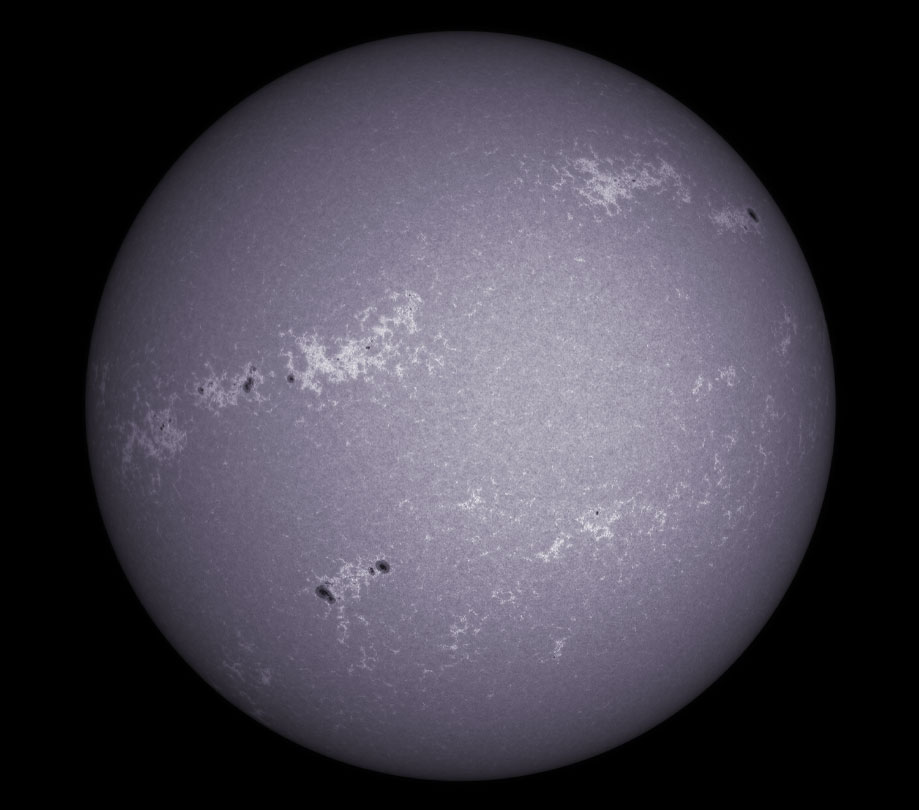
Figure 5 Full solar disk view of sun in calcium-II K (image by J. Thompson)
- For 80mm aperture and Ca-II K filter, Figure 2 gives us a limiting resolution of 1.2 arcseconds. However, with typically below average seeing, resolution is limited to more like 3 arcseconds.
- To capture details as small as 3 arcseconds we need to take ½ to ⅓ of that, or 1.5 to 1 arcseconds, at the focal plane of our camera. With our scope focal length of (80*6=) 480mm, Figure 3 indicates that we need a camera with sensor pixels around 2.4 to 4µm in size.
- To capture the entire solar disk we need an FOV of 30 arcminutes or more. Assuming 4µm pixels, and thus 1.5 arcseconds per pixel at our focal length, we need a sensor resolution of (30*60/1.5=) 1200 pixels. This translates to a sensor size of (1200*4/1000=) 4.8mm square or larger.
- Referring to Table 1, there are numerous sensors that fit this scenario, including IMX178, IMX183, IMX533, IMX545, IMX546, and IMX547. In terms of cost, the best choice is probably cameras using the IMX178 sensor, although caution should be exercised if attempting to use this same camera to image in H-α due to the sensor artifacts described above. Cameras using the IMX035, IMX290, or IMX462 are also potential solutions except that these sensors are a little bit too small to image all of the Sun’s disk in a single FOV.
Scenario B
- 120mm f/7 refractor + Daystar H-α Quark w/4.2x telecentric Barlow
- close-up solar detail, 1/8 of the disk (Figure 6)
- above average seeing
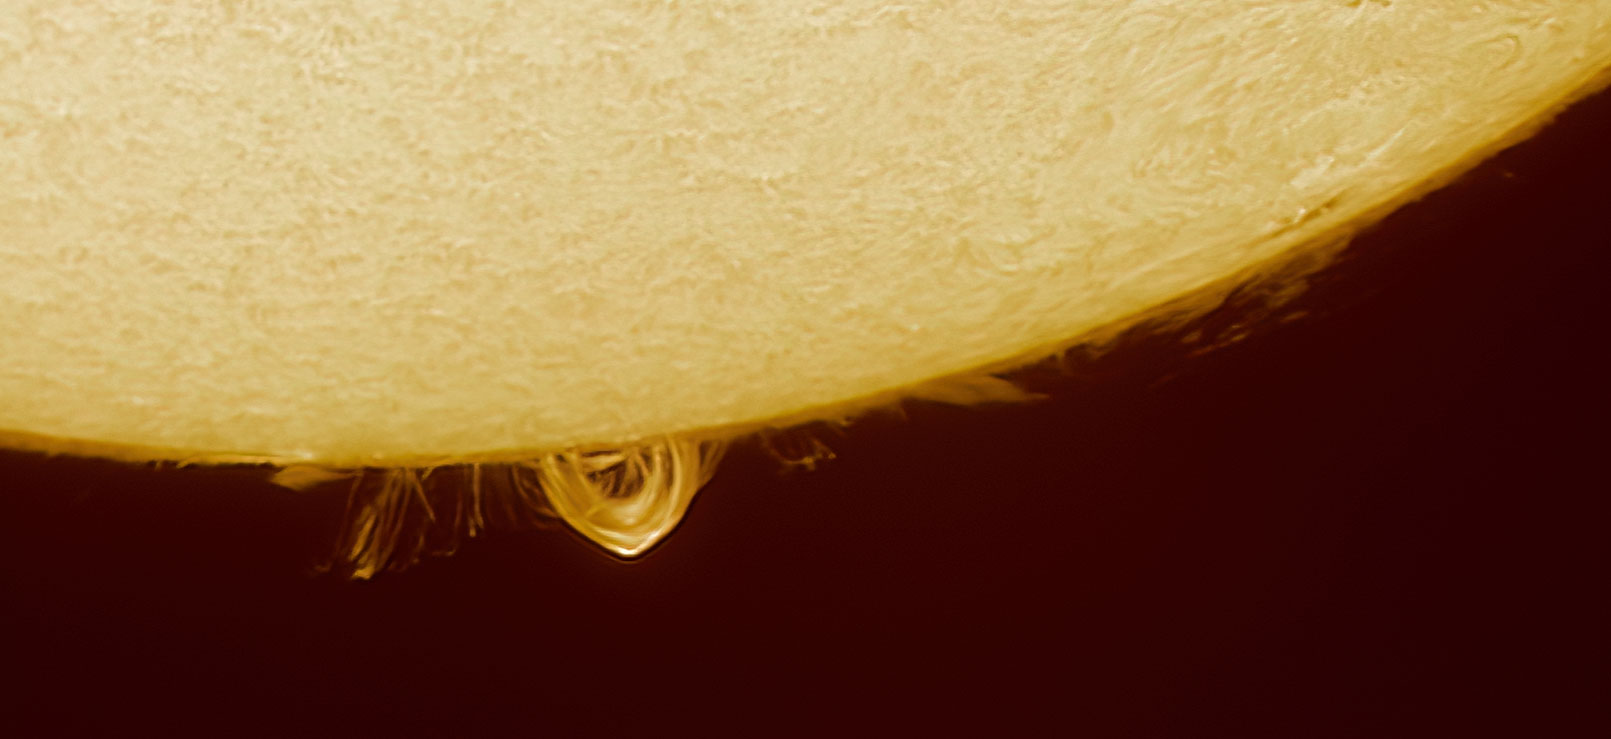
Figure 6 Detailed view of sun in H-α (image by J. Thompson)
- For 120mm aperture and Hα filter, Figure 2 gives us a limiting resolution of 1.4 arcseconds. With typically above-average seeing, a resolution of 1.4 arcseconds should be achievable.
- To capture details as small as 1.4 arcseconds we need to resolve ½ to ⅓ of that, or 0.7 to 0.5 arcseconds, at the focal plane of our camera. With our scope focal length of (120*7*4.2=) = 3528mm, Figure 3 indicates that we need a camera with sensor pixels around 8 to 12µm in size.
- To capture 1/8th of the solar disk we need an FOV of around 4 arcminutes. Assuming 12µm pixels, and thus 0.7 arcseconds per pixel at our focal length, we need a sensor resolution of (4*60/0.7=) 343 pixels. This translates to a sensor size of at least (343*12/1000=) 4.1mm square or larger.
- Referring to Table 1, the best fit for this scenario is cameras using the IMX432 sensor. Alternatively, cameras using the IMX174, IMX429, or IMX492 could be used in a bin 2x2 configuration.
I personally find great enjoyment in imaging the Sun and I believe many others do as well. An important part of successfully imaging the Sun is the selection of a suitable camera. In this article I have provided, for those interested in getting into solar imaging, what I think is enough information to make an informed purchase of a camera. If you have any questions, please feel free to contact me.
ScopeTrader's latest survey
Featured Stories

Stay Updated
Sign up for our newsletter for the headlines delivered to youSuccessFull SignUp

|




Comments